Wednesday, February 24, 2016

Goat Cheese Balls: Not your regular Cheese Ball


Good evening everyone! Tonight I have a nice little treat for those goat cheese lovers. Earlier this week I posted about a Burnt Onion Dust and honestly I loved it. We are going to use that and the Beetroot powder from last week’s post, along with the blood orange Relish for our goat cheese balls. I’ve seen post’s where people call them goat cheese truffles, unless it’s a real truffle or truffle chocolate, I won’t call them that. These make a great snack and like all of my recipes or discussions so far, a great dish for a first impression. It doesn’t take a lot of time. Once you already have these powders, dusts, and relish made then it shouldn’t take more than 10 or 15 minutes to put together. I guess if you have a lot of people over or doing a large quantity it will take more time. Anyways! Let’s jump to it. 

You’re going to need the following: -

1 Log goat cheese
1/3 Cup Dried Cranberries
1/3 Cup Cashews (get extra for you to snack on)
Burnt Onion Dust
Beet powder
Dukkha*
1 bunch Oregano
Blood Orange & Papaya Relish
Black pepper

These are all things that I had already made in the kitchen and thought they would all be really good with the cheese. Besides the Dukkha, I have a recipe for all of those powders.

First thing is we are going to take the relish out of the fridge so that its room temperature. Take your cashews & give them a rough chop and put them in a pan on a medium heat. We are going to give them a toast on the stove. We just want to get the nuts a little brown, do not burn them, and constantly move them around. Once they are finished you can take them out and put them in something to cool down. Now we will give the Cranberries a rough chop also. We have our nuts and cranberries all done and in containers. Take the goat cheese and put it in a mixing bowl.

We then want to add our cranberries and cashews. I used half of what I had then checked to see if I wanted more. At the end of the day, if you want more just add it. Crack a small amount of Black pepper into the mix. Now with your spatula or wooden spoon, just work the mix for a bit. Get everything into the goat cheese. Put the mix in the fridge for the time being.


Pick your oregano leaves. Only use the small green leaves. We want everything to be elegant. There’s nothing worse than serving a nice snack with an ugly big green leaf that will be over powering in flavor. You want just a hint of the oregano when you bite into the balls.


Once we have everything together, take out the goat cheese and scoop a little over a tablespoon and roll it into a ball using your hands. Now just add your relish on your plate or board. Then place your goat cheese on top, we are then going to add a "dust" of your choice on top. Finish with your oregano and serve.

A nice elegant snack that you can use to impress loved ones, your partner or friends. At the end of the day you have changed your game by serving typical goat cheese in a different form and with different accompaniments.

*Dukkha is a Mediterranean spice & nut rub that has sesame seeds, coriander, cumin, dried mint leaves, Pistachio, Hazelnuts, cashews. There are many recipes online, and you don’t have to follow any single one to be exact. Don’t buy it in a supermarket. Try and make your own mix.
Please ask any questions or leave comments. Keep wanting to learn and try new things, don’t forget. Food is life!


Monday, February 22, 2016

Burnt Onion Dust


Hey everyone. Tonight I have a Burnt Onion Dust recipe for you. Like last weeks beets, this is just as simple. This recipe though is only an introduction to a few other things coming this week. So if you want to be a part of this culinary journey with me, then lets go.

The Burnt Onion Dust was very fun. Despite being burnt to a crisp, it still has the taste if onions. But the bitterness doesn't overcome the flavor .

You're going to need a broiler, so turn it on first.

Peel your onions and cut them into rings as thin as you can. The thinner they are the faster the process of burning them will be. Once you've sliced them, place in the pan then in your broiler.


My onions took 45 minutes. Yours should take the same or less. Check them every fifteen minutes, carefully take out the ones that are already burnt.


Once everything is burnt to a crisp, allow them to cool down before you blend them. Put in blender and let it go until everything is a powder like consistency*.


Make sure you keep them in a dry air tight container.

This will be all for today, Later on this week I'll show you what we can do with our new little condiment

*If they aren’t totally dry it will cause lumping and moisture to the powder when blending

Friday, February 19, 2016

Last minute meals: Spiced Potato Crema & Chicken

Do you ever just sit down and brainstorm about what you're going to make for lunch and eventually you come up with something that is simple and yummy. Then all of a sudden a light bulb blinks above your head and there you have it, a new post for your blog or Instagram?  I’m almost pretty sure everyone has, and honestly those are the times the dish comes out superbly. I’ve seen brainstorming result in amazing dishes being created, it has happened so many times in the restaurants I've worked in. 

I figured out what to do. I seasoned my chicken thighs & diced potato with salt & pepper and put them in a pan with some spicy mango salsa along with some bay leaves, dropped in nob of butter, poured some water then just left them there to cook.

As I leaned against the kitchen counter top, typing this story, the sun was setting and I was still brainstorming. Green! that was it. I dashed into the fridge and pulled out the most Spanish ingredient I had. The Jalapeno! But with what? I thought. I found some Italian parsley and said "yup, this will do". I got a pot of water going so I could blanch the parsley. Gave the jalapeno's a rough chop and waited. Standing up watching water come to a boil, definitely doesn't make it go any faster. 

I pureed the jalapeno with some oil until it was smooth then I boiled the parsley for 10 seconds and blanched them in an ice bath. Once it was cold I added it to the jalapeno and let it go in the blender for a bit. I didn't need it to be a perfect puree; Added salt and saved it in a container.

I didn't forget the chicken and potatoes, don't worry, they were already done by the time i checked on them, I separated starch from protein in two different containers. The potatoes then went into the blender( don't worry I have a magic bullet so I used a new top) added some water, a little touch of oil and let it go for 10 seconds, if that long. If you make it blend too long the puree would have a sticky, glue like texture.

In the end I plated my last minute dish idea, which turned out to be quite divine.   

Whether you are cooking at home or work, it's supposed to be fun, even if it’s a dish you’ve already made or something you want to do for an experiment. Keep cooking and remember - Food is life.


Thursday, February 18, 2016

Can you Beet like me? Beet Powder


Hey everyone! Friday is around the corner for you TGIF people. That means you get to spend a whole weekend cooking! Well, I hope you get some cooking and experimenting done. Especially after I show you a neat little ingredient that you can add to your pantry list with ease.

 If you love Beets, this is definitely a cool way to use them. This recipe is quick, and easy. You will need:-

1 lb. Beet

This is probably the shortest recipe you’ve ever read in your life. Anyway, it’s pretty simple everyone.

Get your beets and peel them. Give them a quick rinse, just to get rid of any leftover skin or dirt.


Now, if you have a mandolin then adjust it so you get paper thin slices. If not, get those knife skills working. Just try to maintain a consistent thinness so they can be evenly cooked.


Place them on the trays of your food dehydrator or on sheet tray for your oven. Bake them at 150 F for 3-4 hours. They should be nice and crispy


Now I checked them every hour just to track their progress. You don’t want them to burn so please don’t forget. Once they’re done, let them cool then give them a quick run through your blender or food processor. If you have a coffee grinder, then that’s even better. We want to make sure we grind everything to a fine powder.

Make sure you keep them in a dry air tight container.
There you have it, your very own beet powder that can be used for your dishes as a garnish, smoothies, or DIY facemasks.
#beetpowder #Foodphotograhy


Wednesday, February 10, 2016

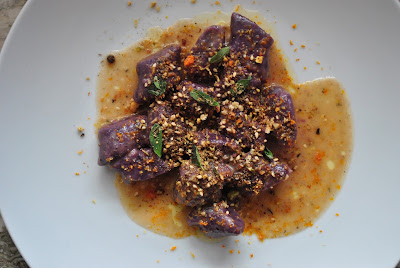
Hot Potato: Purple Gnocchi in Brown Butter with Dukkha, Citrus zest, Smoke cheddar & Breadcrumbs


Good Night everyone! I hope all is well in the world of Culinary Arts. So you all remember when I went shopping two weeks ago and picked up a bunch of random items from the market? Today, well tonight I made Purple Sweet Potato Gnocchi. I’ve also never made this before but it seems that the purple potato’s have almost the same amount of starch as an Idaho potato. I managed to make 40 pieces of gnocchi out of this recipe and while most people like to use a whole egg, I use just the egg yolk. It makes the gnocchi richer.
The key things to remember about making gnocchi are (1) you don’t want the potato to cool down too much, this will make the process a lot harder. (2) Don’t over work the dough, if you over work potato starch it can become very gloopy and sticky, which would mean you would have to add more flour than needed. (3) Some people may disagree but I find baking a potato on a bed of salt helps dehydrate it better.

It has been three years since I have made Gnocchi and there some things in life you don’t forget. My old friend & boss Alex Grimley was the first person to teach me how to make gnocchi, even then it took me 4 months to get it right without having to ask him constantly to show me or is this correct. I have a lot to thank him for and that is one of them. You see I will type up this recipe and tell you how to do it, but you really need to have an understanding on how to feel if the gnocchi are ready to go. Too many people make the dough and don’t understand why it isn’t firm or why its falling apart. Somethings, you just gain from experience. I will try my hardest to make this understandable for you the eager home cook.

Let’s go!
2 Gnocchi (1 lb. in weight)
2 egg yolk
1 Cup All purpose flour
1 Pair of hands
Nutmeg (this is optional)
Kosher Salt

Preheat your oven to 400 F. Get a baking sheet or pan, pour salt on the base. Place the potatoes on top, take a fork or knife and just give the potato a few stabs to allow the seam to come out while its baking. Put your potatoes in for one hour. 
While that’s going just get your other ingredients out and ready. If you have a clean counter top, then we can use it for kneading the dough. If you don’t want to put it on the counter top, then grab the biggest stainless steel bowl you have.

Please get a medium sauce pot of salted water on the fire, boiling and ready for your potato’s.
Has it been an hour yet? Okay good! Now take the potatoes out and cut them in half. Please be careful to not burn yourself when the steam comes out. 
Leave them to sit for 5/7 minutes. You want to be able to push the inside and feel the heat with out totally burning your fingertips off, you will need them for later. Once the potato is ready, you can push it through a strainer, well, if you have one of those perforated bowls then use that. If not, then just mash it a bit.
Now add a little under a ¼ cup of flour to the potato, and knead it a little, then add one egg yolk and add more flour. You may not need all the flour but once you roll it around and work it, just feel it out. The only way to describe this is, feel your cheek. If the gnocchi are a little harder than your cheek you on the right track. Now roll your dough on your table into a 6-inch log and cut it in half. 
Take one half and let’s roll it ¾ inch thick. Be sure to have flour on the table so it doesn’t stick. Grab your knife and cut the Gnocchi into ½ inch squares and put on a floured pan for storage.
Before we cook the gnocchi be sure to have another pan (I used a glass Pyrex dish), just add some oil so they don’t stick. If you don’t have a glass Pyrex then use what u have, line it with parchment paper and add oil.
We’ve got boiling water right? Okay so we are going to drop some gnocchi in the water and leave them until they float, it usually takes a minute. We don’t want to drop all the gnocchi in at the same time. If you do that, the water wont boil anymore. Once we have cooked the gnocchi just place them in your oiled pan and allow them to cool for when you want to cook and prepare a dish later.

A lot of people like gnocchi because its heavy. Its typically served in brown butter and sage. I did mine in brown butter, citrus zest (see post from last week Friday), Dukkha, breadcrumbs and oregano. I love Gnocchi. 

Saturday, February 6, 2016

Eggplant Moutabel

Eggplant Moutabel Dip

Super bowl is coming up this Sunday everyone. If you want to impress your friends and family this weekend with something different, give this Eggplant Moutabel a shot. I love it because after you roast eggplants it gets a Smokey taste to it that just hits the tongue just right. This is easy and very simple, you can simply have with Pita, crackers, even use it as a spread in your sandwich.

All you need is: -

2 Eggplants
Canola oil
Oregano (picked)
Salt
Pepper
Dehydrated lemon zest (please check previous post)
Chili powder

Preheat your oven to 400⁰F as we cannot cook without a little heat in the oven. Find a roasting pan or Baking sheet, pour some oil on the base and lightly season the pan with some salt ad pepper. Place the eggplants in their skin on the surface of the pan, give them a drizzle of oil and also a light season. Place in the oven for 30 – 45 minutes. 

Once its done put in a bowl and cling wrap the bowl for about 10 minutes. The steam will help cleaning the eggplant easier. Once its ready, just cut the top off and peel the skin from the top to bottom. 


We will then add it to our blender along with a little salt, pepper and about 3 Tbsp. of Canola oil. If you have one of those blenders with the little screw cover for the lid, then you can take it off to add more oil to get the right colour (as seen in the pictures). 


Constantly taste it, season if needed. Once you’re done put it in your bowl, add your picked oregano, zest, and chili. Serve it, surprise your friends and show off your culinary knowledge & skill.


Friday, February 5, 2016

Save that Zest!


  Hey everyone! You know those lovely lemons and oranges you have at home? Before you use them save the skin. The best way to do this is to use a zester or micro plane (they are cheap, and everyone should invest in one). Just give them a quick run on the micro plane and dry them out on a paper towel for 24 hrs.
Keep it, use it on a fish, after cooking a risotto, or a small salad. It’s a great cheap ingredient to keep laying around in your pantry.


Thursday, February 4, 2016

Blood Orange and Red Papaya Relish

Good morning everyone, today’s blog will be a little shorter than normal. Have you ever gone to the supermarket, see something and just buy it out of reflex? Well, while I was at the groceries last week I saw red papayas and got them not knowing what I was going to do, but it didn’t matter. It wasn’t until today I opened my fridge and stared at it for five minutes before thinking of what to do. I took a look through my culinary artistry and figured let’s make a relish. Now relishes are slightly similar to chutney’s but they are a bit savory. I liked this not only because you could taste all the fruits but it wasn’t as sharp as I thought It would have been, and you get a slight garlic taste at the end.

As I was juicing the blood orange, it reminded me of being back in A Voce and making a vinaigrette in the morning. Nothing was better than seeing that rich deep red leak out of the orange. Today all I could do was stare at this blood orange juice in amazement.
Let’s get to making this relish now.

1 med Red Papaya (seeded & peeled)
1 Blood orange (halved)
½ Garlic Clove
1 Tbsp. Ground Mustard
¼ tsp Ground Chili
½ Cup Apple Cider Vinegar
1 Cup Sugar
1/8 tsp Kosher salt


Combine all ingredients in a food Processor, and chop. Once mixed add to a non reactive saucepot and bring it to a boil for 30 minutes. This will help cook out a bit of the harsh acid from the vinegar and the garlic flavor. Please stir it every once in a while. Don’t leave it sitting there to stick and possibly burn. Once this is done, cool it to room temperature then put in a jar and refrigerate.