Monday, December 28, 2015

Post Christmas Brunch: Turkey, Waffles and Gravy

Happy holidays everyone! After lots of eating & belly stuffing, I hope everyone is well fed. You ever wonder what to do with your left over turkey? Well, that depends on if you have any of that good stuff left back. Usually people resort to a fricassee or soup of some kind. You ever just want to have a hearty filling brunch? You see, what I did was strip my turkey to the bone, which was fairly easy to do. You’ll be surprised as to how much meat you can scrape off of a turkey carcass with some gloves on and a fork in your hand. Another thing is I got a waffle maker for Christmas compliments to my family and I haven’t stopped making waffles since. I then decided what better way to spend your Sunday than having a post holiday brunch with those yummy leftovers.

Want to get to it? Let’s go! Turkey gravy and waffle time.

2 Turkey thighs (bone out)
1 Waffle (check Waffle Recipe)
150g Sauce/ gravy
Maple Syrup
1 Sprig sage
2 Tbsp. Butter
1 Tbsp. Corn starch
1 ½ Tbsp. Water

Okay so first thing is, you have any waffles? If not, please check the Waffle Recipe. It’s the Culinary Institute of Americaès recipe and I love it. Once you have your waffles we can go to the next step.
 
Do, you have any gravy left back? Please don’t tell me you used it all up. If you have gravy just pour some into a little pot and warm it up. If you did use it all up I can still help you out. We will get back to the gravy. I just needed to see where you stood with that.

Take the turkey leg and separate the thigh from the leg bone, then going to remove the bone and give the meat rough chop, reserve in a container. Take the sage and give it a chop as well, reserve.
We are going to get our saute pan hot for the turkey. 

Add the butter and sage, I like my butter a little nutty so I prefer it brown rather than just melted. Next we will add our turkey, with a touch of salt and pepper, then leave it to heat up on a medium fire. We want it to crispen up a little, then we will give it a stir. Now because we don’t have gravy we will remove the turkey once its hot and leave all that good stuff in the pan. Add some water/ chicken stock if you have any and “deglaze’ the pan. This is what u will use as your gravy. I am pretty sure its not thick enough so get the corn starch and water, make a slurry. Add to sauce, check for seasoning.
 

Get your plate with your waffles, place your turkey on it, sauce, maple syrup, done! Time to enjoy your lovely brunch. 

Thursday, November 26, 2015

Spiced Plum Chutney

Hey everyone another day of fall, another recipe. Today we have a spiced plum chutney. This is the season for all those spices you have in your house, your cinnamon's, cardamoms, nutmegs. I had some plums in my fridge that hadn't been used up and to be honest I was over eating them so I decided to just knock up a chutney. So I did a check up on the internet to get an idea of what people used. Some people had the longest list of spices ever and I didn't want to lose the taste of the plums so I was very selective in what I used. In the end it was a nice little blend of flavors .

3 Star Anise
1 Clove
1 Stick Cinnamon
1/3 Cup Red Wine Vinegar
3 Tbsp Sugar
1/2 Tbsp Ginger
1/2 Tbsp Ground Mustard Seeds
1/2 Tbsp Ground Black Pepper
3 T Water
1 Cardamom
1/4 Tbsp Chili Powder
1/4 Tbsp Paprika
1/4 Tbsp Ground Cumin
4 Red/ Black Plums

Now the plums can be done two ways, you can either give the plums a cross mark at the bottom of the fruit then put them in boiling water for up to a minute, shock it in ice water, then peel it and cut it in half then separate them. It's a very common method for tomatoes. If they are hard enough you can just grab a peeler and peel them then just cut them in half up to the seed, rotate the sides in opposite directions and separate them.

The fact of the matter is, its up to you.
Once you've got your peeled and separated plums then cut them up and put them in the pot.

Measure your spices and liquids then put them in your pot. Keep your pot on a medium heat and let the soon be chutney simmer. Be sure to constantly stir it. You don't want it to burn

Once its done, remove your Cinnamon Stick, Anise seed, and Cardamom seeds 

Friday, November 20, 2015

Care for another fall salad?

Beet Root Salad
1 Stick Cinnamon
2 Cardamom seed
½ Star Anise
3 Clove
1/3 tsp Nutmeg
3 Small/Baby Red beets
1 Yellow beet*
½ cup baby spinach
2 Stalks purple Kale
1/3 Cup walnuts
¼ Grapefruit
¼ Red Cabbage
8oz Goat Cheese
2tbsp Heavy/Whipping Cream
Lemon zest
Salt
Pepper

Do you ever get bored of your classic beet salad with arugula goat cheese and beets? It’s nice but I’m a little over the original salad. So I decided I wanted to do my own. You know, there is something about spices that I love, some people don’t like them; I would cook with them every day if I could. The spices in this salad are very subtle and aren’t overpowering at all; I love it.

Wash your beets thoroughly and remove the roots

Take your spices and just place them in your roasting pan, place your beets in the roasting pan then grate the nutmeg over them, followed by salt and pepper. We need to drizzle it with oil or else it will burn. Add a small amount of water and wrap your pan with foil, before putting them in just give the beets a little shake so they move around, be sure to constantly give the pan a push and pull every time you check on them. This will ensure even roasting and allow the spices to get over the beets more.
The Yellow beets*(try and use one similar in size to the red beets) we will roast separately with oil, salt and pepper. I didn’t want too much spice in the salad and not enough beet flavor so I did them differently.


Once they are cooked you will have to cut the beets into quarters and save them in separate containers.

Next grab all your leaves, wash and rinse them then leave them to dry.
We will take the cabbage then shred it and save it in a bowl or container.
The grapefruits, we are going to peel and segment them like we did in the previous recipe. Don’t cut them, we are going to leave them in whole pieces.

The goat cheese is going to be made into a spread. To do that we will put the cheese in a bowl, and add a little heavy cream. We are now going to work it with a spoon or spatula until it’s a paste then add a bit more cream. When it’s soft enough you want to use a whisk now to work it and add air to the mixture making it light, you want it to almost reach to soft peak. Add a small amount of salt, pepper and lemon zest and give it a final mix. Taste Taste Taste!  


Put the goat cheese on the bottom of the plate and mix all of your ingredients in a bowl (walnuts, cabbage, kale, baby spinach, grapefruit, and the yellow beets) add a little salt, pepper and olive oil. Plate and serve! Have a great salad and enjoy


Monday, November 9, 2015

Citrus Fall salad anyone?

A Citrus Salad for Fall
1 Vanilla Persimmon
1 Yellow Beet
1 Shallot
1/3 Pomegranate Deseeded
½ C Spinach
4 Stalks Purple Kale
1/3 Red Cabbage
½ Pint Gooseberries
1 Red Grapefruit

1 Pakistan Sweet Lime
1/3 Celery Root
½ Milk
½ Cream
2 Tbsp. Red Wine Vinegar
Salt
Pepper
1/3 C Olive Oil
Canola Oil
1/2 Tbsp Honey

From left to Right: Red Grapefruit, Sweet Lime,(top) Persimmon, Vanilla Persimmon, Pomegranate
Hey everyone! It’s fall and soon to be winter but that doesn’t mean that we need to stop eating those lovely little citrus fruits just because it’s a different season. Last week I went shopping for the house and ran into a few good looking produce in the market, so I decided to go back the following day. I knocked up a list of things I wanted, and figured I would make a really nice salad that was refreshing using fall fruit and vegetables. Please keep in mind I had never used some of these ingredients before and this was just supposed to be an experiment. Let’s get to it then.
Persimmon
So, I took a slice of all the things I had never eaten before. The Persimmon was quite interesting, it had a really mellow mango like taste and glowed a bright glossy orange on the outside and a dull matte orange on the inside. It was weird, it almost had the shape of a tomato and the texture of an apple.
Next was a Pakistan Sweet Lime, it was a bit bigger than your average lime and wasn’t as green. You know when limes start to lose their pigment of green and get a slight yellow tinge? That was the color of it. I sliced it, they tasted like a ball of honey in the skin of a lime, sweet but not overpowering. I gave a slice to my girlfriend and she looked at me in shock, like she had just tasted a bit of magic. Her eyes opened up wide, then she asked me “did they put sugar in the soil?” I almost died from laughter but I couldn’t blame her.
Let’s get into the details now as to how this yummy salad came together. I got everything together and one by one I prepped each ingredient. The Persimmons I put on their side and cut them into really thin slices, so they looked like disks. Once I couldn’t slice anymore, I placed the cap of the fruit on the board and sliced the sides. Now we have semi circles and full circles of this fruit, just to keep it a little exciting.
The Golden Beet will take the longest to cook. About an hour in the oven (feel free to boil it if you want) I seasoned mine with salt and pepper, drizzled some oil over it and covered it with foil. I baked it at 400⁰F for 1 hour then took a towel or paper towels and peeled it while it was still hot/warm. I cut them into segments and placed them on the side in a container.
Cooked Celery Root
Take your Celery Root and peel it, either with a peeler or shave off what you want from the whole root with a knife then cut it. Place root in a pot. Now I have half cream and milk in the recipe. You want the liquid to just cover the celery root. So you’re going to pour the milk half way and the other half with cream to cover the celery. Add a pinch of salt and boil until soft. When they are done, put the Celery Root in a blender then pour just enough cooking liquid to cover it and puree. You want to pour just enough canola oil to turn the puree almost white and help with the texture. Taste! Taste! Taste!
The shallot I put on its side like the Persimmon and sliced it. I picked through the spinach leaves and chose the smallest leaves in the bunch, I washed them then put them in a container with tissue. I did a similar process with the kale but instead I took the leaves off the stalk and chose the appropriate sizes for my salad. The red cabbage was also easy to prep. I just cut a third off of what I had and just sliced those fairly thin so it had a shredded look to it. The gooseberries were sliced in half.
Gooseberries

Now, the grapefruit and lime. I’m not sure how you peel your citrus but I cut the top and bottom so it can stand upright. I then run my knife down the sides along the body. This takes off the skin and any bitterness, and will help to segment the pieces. I then segmented it, kept half as they were and took the other pieces and just cut into tiny dices. Do the same for the Sweet lime. Once you’ve finished that, please squeeze the juice from the remains of the fruits and keep them in containers.
Take your Pomegranate and slice horizontally in half. Don’t cut it all the way. Twist it and it shall open up. Then take a wooden spoon. Turn the Pomegranate seed side facing your bowl and hit the outer shell. The seeds should just start to fall out.
(top) Shaved Red Cabbage, (bottom) Rolled and Sliced Cabbage Leaf
The dressing was very quick and simple. Put the juices, diced segments into your bowl or container. Add the honey, then the vinegar, pour the olive oil and whisk. Don’t use all of the oil at once. It’s always better to have too little then adjust. Taste it, season it, there should be a nice balance between sweet and sour and not too sharp.


Mise en Place


In another bowl get all of your greens, segmented fruits, your cabbage, kale, beet root and shallots together. Pour your dressing over it and mix your salad so it’s well coated. I put the Persimmon disks on the plate then I placed the salad on top, then with the celery root puree I put little drops on the side and topped everything with the pomegranates. Over all it was a nice salad, I had my girlfriend try as well and she liked it. Give this salad a try, this was enough for maybe two people if you stretch it. You can adjust quantities for more guests and even make it a little bit more rustic and tweak it to your liking. Tell me how it is! Thanks a lot everyone for taking the time to read this recipe.


Finished Product
From a different perspective

Saturday, October 31, 2015

Roasted Pork shoulder


Good Day everyone. I’m sorry I teased everyone about this post but my week had turned out a lot busier than I planned. Let’s jump straight into it. Last week was a family member’s seventieth birthday and I was asked to cook something for it. Sat down and thought about what to make, I figured a Lamb leg would be fun but when I found out that it was for 25 people I instantly knew that I would need two legs. We all know that lamb isn’t the cheapest meat around so I just went with a pork shoulder.
I decided to go a little Italian/Spanish with this. The day of the party I woke up early to get started, I felt like my dad. He would wake up early and do that while having a cup of coffee. So I cranked the oven at 275⁰F, got my foil paper, grabbed two head of garlic and carefully cut off the root, then seasoned it with black pepper and drizzled some oil, wrapped it up twice then out them in the oven to roast. After about two and a half hours the house smelled amazing. With the garlic finished it was now time to get busy. You thought I would tell you more of the story behind the prep? Sorry I have to give you the recipe first.

Pork Shoulder
1 Pork Shoulder (boneless)*
2 Spicy/Honey garlic Sausage (raw)
1 Lemon zest
½ tsp of Olivaca Catalana D’Arbequina **
2 heads/bulbs of Roasted Garlic
1 Cup Parsley (chopped)
1 Bunch scallions (chopped)
3 Bay Leaf
½ bunch Rosemary (chopped)
Salt + Pepper

Equipment
Blender/ Food Processor
Boning Knife
Cutting Board
Baking Pans
Butcher's Twine

That lovely piece of pork that you have in your fridge along with all of your ingredients, take them out. If you’re like me and you have the skill to debone a pork shoulder then kudos to you. For everyone else, you can buy your shoulder bone out. After I deboned the pork I poked it all over with a paring knife so that the seasoning got absorbed a little easier throughout the meat. I heavily seasoned it with salt and pepper and just let the pork sit while I started to get my other ingredients together.
Chop your parsley, Scallions, Rosemary, Lemon zest, and keep it in a small bowl. Take your roasted garlic, the cloves will fall apart don’t worry. What you do is take a spoon and press it from the tip to the end and just watch the garlic come out of the skin, add it to your blender. Take your sausage and remove them out of the casings and drop them into the blender/processor with your garlic, add a tiny amount of olive oil so the blender/processor doesn’t seize up and overheat.
Puree, once it’s a smooth consistency add it to your bowl of chopped herbs. Add the Olivaca to the mix with a little bit of cracked pepper.
Now that you have your paste we are going to spread it all over the inside of the pork, making sure we get it in every section.
We’ve got our spread all over the pork, now we have to roll it. This may or may not go down very well, you with either be able to tie this pork shoulder or just get frustrated with me and bake it flat. I mean, either way works fine. But having this skill is always a plus. I think I might have to make a tying video now. 
Anyways! If you know how to tie the shoulder do it and sprinkle the skin with salt pepper and a little sugar for caramelizing.I baked mine for 2 ½ hours at 350⁰F, the pork spent the first hour and a half covered then I took the foil off for the rest of the time to allow the fat to render a bit. You should constantly baste the pork. Now if you have more time like maybe four or five hours then I suggest baking it at a lower temperature like 275⁰ or 300⁰F, this will allow more fat to render.
*Okay, so the people that can’t debone a shoulder of pork what you do is peel the layer of skin off three quarters of the way and keep it peeled back, now stab the pork constantly to allow seasonings and rub to get absorbed. Maybe even make and incision through the front so it’s even more inside the pork, so it looks stuffed. 
Once you’ve rubbed/stuff the meat, place the skin back on and take your string/twine and just run it under the pork and make a knot over the skin to secure it from moving.

** I know not everyone will have a glass jar of Olivaca, so what you can do is fine an olive tapenade. This is just a puree of olives, garlic, sardines and seasonings.
I am very sorry everyone but I totally forgot to take a picture of the end product, we were rushing to leave the house to go the party.

Tuesday, October 13, 2015

Have you ever tried Plantain Jam?

Good day everyone, hope all is well. Today we will be making something sweet and yummy from an ingredient that I am almost pretty sure not everyone likes. Everyone loves the banana correct? But what about its cousin the Plantain? I feel like in the Caribbean you only see Plantains used one way and that’s sliced and fried. It’s almost as if people don’t want to explore. The Spanish are the only other ones I know of that do something a little different and that’s just smashing the plantain when it’s fried (Tostones). So here is how the story goes.

I had these two Plantains on my kitchen table just changing color almost every day until I decided to do something with them before they went bad. I picked them up, looked at them, felt how soft or hard it was, brainstormed and decided I am going to make Plantain jam. Huh? Plantain Jam? Yes, Plantain Jam. It would make perfect sense as its sweet as it is already. Now I went ahead and made this jam, it took about an hour but it was fine because I was in no rush. Plantains are nice but I find they lack a little kick, I find that it’s a subtle flavor that’s almost overpowered by sweetness. I’m not sure if you understand where I am coming from but hear me out. I added lemon to it because usually when u make a jam u add an acid to balance the sweetness. I chose a lemon because I felt it was the right ingredient that would have given the Plantain that “oh!” taste to it.

My Plantains had a lot of black spots on it. It was so ripe that when I cut it the skin was almost paper thin on the inside which made it a pain to peel but it was worth the little extra labor. I found that if you cut the Plantains in half horizontally (please, don’t go slicing down the Plantain vertically) helped and then instead of peeling it like a banana. If you run four slices down the side and peel sides left to right instead of peeling down it should be a little easier.\

This is the recipe, now everyone please remember that not all fruits yield the same product. Your Plantain may not be as sweet as mine, always taste and adjust.

1 Cup White sugar
2 Large Ripe Plantain
½ lemon juice
1 lemon zest
3 tbsp Water
2 Lime Leaves


Peel your Plantains and give them a rough chop and put them in your pot along with your white sugar and all other ingredients. Now put the heat on low and just let it cook. Also, please stir your jam occasionally. This isn’t a fast process, it’s something that has to take time. If you rush this, the sugars will caramelize and probably burn. Taste it, can you taste the lemon? Is it subtle? Can you taste the Plantains? Do you understand what I mean with the kick now? I hope everyone enjoyed the recipe. Please try it and let me know how it taste.


Wednesday, October 7, 2015

Spiced Carrot & Chickpea Soup

5-6 Qt stock
10 -12 Carrots
1 Whole onion
4 Clove garlic
2 White potato/sweet potato
3 Cups chickpeas (canned or fresh)*
2 Tsp ground coriander
4 Tsp ground cumin
½ Tsp ground chili
Olive oil
Salt & Pepper

Hey everyone, so over the weekend me and my girlfriend went shopping and saw ten pounds of carrots for $1.87, you know we got them right? We weren’t going to let this deal get away from us. Naturally the first things that came to mind was to make a massive batch of orange goodness soup. I decided to make a spiced chick pea and carrot soup, I did look up a recipe online so I could get a spice ratio for the soup just because I wanted the ratio to be good and it’s not something that I have totally perfected. Once I had an idea I fixed the measurements to my liking.


So get all your stuff, your containers, your stock heating up, your spoons, measuring spoons and cutting boards. Have everything ready and organized.

Get your stock heating up on the stove while we start getting ready to make our soup.
First we are going to knock off the tedious stuff, the peeling of more than a pound of carrots and two potatoes. Once you’ve got them all peeled just dice them. They don’t need to be equal sizes because it’s a soup and you’re going to puree it in the end. Normally I would tell you to keep the potatoes in water but they shouldn’t be out long enough to change in color or make a difference at the end.
Next we can peel the onions and garlic. We are going to give them a rough chop and save them in a container. Please don’t cry, the onions are sorry for what they have done to you. I’ll give you a moment to stop tearing up. Right! Back to it then. We have out carrots, we have our onions & garlic. Next is our spice, please don’t measure this with your tea spoon that you use for stirring your coffee and tea in the morning. Go grab a real measuring spoon and measure those spices.

Grab your stock pot, I own an 8 Qt pot. Pour your olive, just enough to line the bottom of it.  Once your pot is warm (You can tell by the waves in the pot or u can just drop a pieces of salt in to see a reaction or one of the pieces of onion) add the rest of your onions and garlic to the pan. Season them with salt and pepper. We want to cook the aromatics slowly, so keep your pot on a fairly medium heat until you can’t smell those onions anymore. You can then drop the spices and crank the heat up a little higher. We are trying to toast the spices with the aromatics and release those oils and scents from the spices. You’ll be surprised the different flavors that come out once you toast spices. 

The spices are toasted, the aromatics are all cooked out, now it’s time to drop in the carrots and potatoes. Season them again with some more salt and just leave them there to cook a bit. It shouldn’t burn, if it’s catching on the bottom it because your flame is too high. The chickpeas can go in after the carrots ,then get the stock in there. 

Once you’ve got it all in just taste the liquid, is it super bland? Can you taste a little bit of salt? Does it want more? These are questions for you to ask yourself. Add more salt if you think it needs it but don’t forget that the soup will reduce so don’t put too much salt. It’s better to have too little than too much. Now just watch that pot of wonderfulness just bubble away. You will have to take that foamy gunk off the top of the soup. We call those impurities.


Once your soup is done you can take all the solids out and put them in a blender and just add some of the liquid from the soup in and blend it until smooth. I left my own with some texture. Adjust the seasoning and there you have it. Yummy soup. Enjoy!


*If you have fresh chickpeas, please be sure to soak them over night or else they will be extremely hard and grainy in your soup.

Friday, October 2, 2015

A book a week: Around the world in 120 Recipes

Hey everyone, as I sit down here getting ready to type and talk about this book all I can do is smile and sip my coffee. I had to read the book over this week, just to refresh me with what I really liked about it.

Around the world in 120 Recipes is pretty awesome. Allegra McEvedy is an English female chef and is brilliant. She gives you a long introduction about herself, her childhood and her journeys and her obsessions with knives (which every chef should be). After reading her introduction it’s almost as if she sat down across the table with you giving you her story in person. Based off of the title of the book you can assume what she has done. She traveled and ate across the world and pretty much scribbled and saved her food thoughts, ideas and got the recipes from the cooks/ restaurants.


These stories and recipes aren’t about Michelin star restaurants. A lot of them are simple recipes that you can cook at home yourself. Everything looks rustic, and fun to eat; keep in mind eating is the best part of it.

I think the best part of the book would be the Caribbean section. We are such a small region yet I am sure everyone reading this knows very little about other Caribbean cuisine. I was very pleased to see Buljao in this book.  I had no idea that it was a Grenadian thing because my Trinidadian family always made it. Which left me wondering, is it really from there? or is that the Amerindians from one country that were taught it migrated and just continued cooking food their way. It’s funny how so many cultures and cuisines are so similar or even the exact same with different names.


There is a recipe I did try one time and it was pretty yummy. The Rabbit Lasagna, it was a long a recipe and took some time. One main reason is you have to brown the meat; if you have a smoke detector that goes off a couple of times (I eventually just pulled mine out of the ceiling when I was in NYC) you'll understand. Once you had cooked the rabbit in the broth you have to strip it of all its meat. You have to be very careful because Rabbits have fine bones and if you’re not careful and miss a few I can guarantee that swallowing or choking on them can leave a bit of a scare. In the end it was totally worth it.

If you want a bit of knowledge of some local food from countries around the globe, this is the book to get. Allegra does a really good job at making you smile and enjoy her book.

My mother has been one of the many supporters in my dream and firmly believes that if you want something bad enough it will happen. Whether it was pushing you because you lost sight of the end goal or just giving you some wisdom and guidance. I thank her for this book and continuously supporting me

Thursday, September 24, 2015

A book a week: Flour & Water


Flour + Water by Thomas McNaughton was a great read and I have to thank my previous boss, Chef Benjamin Lee. While I was at A Voce on 41 Madison in NYC, I worked the hot apps station which was right next to Pasta station and I was always curious and enjoyed watching the skill and art of making a silky smooth pasta dishes. I would take whatever spare time I had after or in-betweens services to go downstairs and watch Bertha our pasta lady make our pasta, she made you feel like you were here grandchild.

 I was constantly asking my chef questions about pasta and why he did this or that, I stood over his shoulder and watched what he did like a hawk, I am sure some days he was happy to know that I was so interested and other days it drove him up the wall. One day I asked him about really good books to read, he told me about two, one I haven't gotten yet (sorry chef!), the other was Flour + Water, a story about three men, who were all connected in this small niche.

Thomas McNaughton left America to train in Italy and learn the art of pasta making. When the time came for him to go back home he applied for a job on craigslist not knowing what he was getting into. Both he and the two other men end up having a restaurant with great food, where the pasta was made fresh every day and became the main idea behind the name of the restaurant, Flour + Water

You learn the basics in this book and get an understanding of the real art of pasta making without having to fly to Italy. McNaughton goes deep into his descriptions making you understand the difference between different types of pasta and which ones to use for specific sauces. It sheds some light in the pasta world for you. Almost every dish in this book has a story behind it or how it came about, which is awesome because its almost as if the dish has a personality.

The book has a lot of character and has loads of yummy pictures that influence you to get up and get to rolling or learning. I hope you get this book and enjoy it as much as I did.


Tuesday, September 15, 2015

A book a week: Eating italy


Hey everyone! So, today I want to know what you read. I’ll show you what I keep close by when I’m ready to brainstorm, have an idea or I just down right need some kind of inspiration. Some of these books were what I got from school, they were gifts, or just good finds. We will talk about a book for everyday this week.

Lets get to talking.


Eating Italy by Jeff Michaud with David Joachim. I found this book in a BMV store on Bathurst. I gave it a quick flick through and I thought it was going to be a cool book. Jeff Michaud talks about going to Italy and learning so much from so many different regions of Italy. Its a great book with simple dishes and I think is good for you to have in your home or kitchen.

My favorite chapter is the first, its about the meats and charcuterie. Jeff spent his time working in a butcher shop in Paladina. He spent his early mornings learning from the best in the region, I'm not sure how many of you all are willing to do that just for knowledge. This is a great example of what being obsessed with what you do as an art. Butchering like anything you do takes loads of practice, skill and concentration, Jeff shows this in this book but you also learn that he has a lot of fun doing it which is what matters most.


The pictures of the dishes in this book are bright, vibrant and look yummy!

There is a recipe in this book that I keep staring at, when i get a chance i will do it and see how it comes out. Rabbit, some people don't like these little furry animals but the Chinese and Carib side of me only thinks food when I see a rabbit so this dish screams eat me when I see it. An oven roasted Rabbit Porchetta with a Pepperonata. Now Pepperonata is a common thing in Italian cuisine that I saw back in New York. It is so versatile and is addicting.


You get to have an idea of Jeff's personality and if this book doesn't make you want to get up and go to Italy just to try the food then I don't know what will. The Chef has got a great restaurant in Philli that has a great menu and has classes. If your in Philli I suggest checking it out. Go buy this book and have a good read, enjoy and see you tomorrow!

Saturday, September 5, 2015

Corn & Chicken soup

Corn soup ( leftovers can go with your Chicken dish for sauce)
6 Corn on the cob
2 Cans of Cream of corn
2 Celery Stalks
1 large onion/ 2 Medium onions
1 Head of garlic
1 Whole chicken/ Leg Quarters
Bay leaf
Thyme
Salt
Pepper

Equipment
1 large Pot
1 Cleaver
1 large bowl

Method

You need to disassemble the chicken, you want to cut the legs, wings and breasts off. Once you’ve taken those off, cut each body part into three pieces. Your breasts you cut into as many cubes as you can. The chicken back should be used as well but that’s subjective. Season them with salt (seasoning salt if you have) and black pepper and leave it to sit.

Get your corns, now whether you want it to be all kernels or a bit of both is up to you. I cut mine in half and ran my knife down the side to take the kernels off. I took maybe three corn on the cob and cut them into small quarters.

Now to do your onions and celery, chop them into small pieces & save a place for them in a small bowl

Grab your garlic use same description as in other recipe using your hand and peel them, you can either chop them really fine or run it through your blender with some oil. Get your pot, pour some oil in there, and drop your garlic into it then turn the heat on low/medium. You want to slowly cook the garlic until it turns golden brown, reason being this would bring out the true flavor of garlic and its sweetness. Once you’ve done that then add your celery and onions into your pot , season lightly with salt and pepper. Cook them until you can’t smell that strong harsh smell from onions. Once that’s all done then add your corn , season again lightly with salt and pepper. Open your cans of corn and add them to your soup, then get your bay leaf and thyme and add them to it also. Get your pieces of chicken in there and fill with water, about 1 or 2 inches above the chicken is just fine. You want to bring your soup to a boil then turn it down to a simmer, once simmering you will get a brown foam on top of your soup. Be sure to skim your soup until there is no more foam on top.

Constantly taste your soup, look for the taste of your corn, a little chicken, and most importantly taste for salt.

The soup should cook for maybe an hour, but then again that depends on how thick you want your soup and how much flavor it has. The longer you keep the pot cooking is the more it will thicken,  don't forget to stir your soup or else it will catch on the bottom.


Culantro stuffed chicken, Corn sauce & Spiced Sweet Potato

Good day everyone! You all ready for today? So last week Sunday when I was supermarket shopping (which can take about two hours because of constant distraction and looking around) I ran across culantro. Yes it’s very similar to that citrus herb cilantro that looks like parsley. I mean it wasn’t the best quality but I got pretty excited about even finding it. Just so you know, it’s the Spanish equivalent of cilantro. Moving forward to later on this week, I took out six chicken breast in the morning to defrost to cook dinner, not knowing exactly what it was that I wanted to do. That’s pretty much how my evenings for dinner go unless I have something that I brain storm about for a week.


After constant back and forth, opening and closing the fridge I figured it out. I was going to stuff the chicken with loads of culantro and a little bit of garlic and spring onions (that’s how far I got with figuring it out). I looked in the fridge then there it was, left over corn soup from Sunday (there will be a recipe for that as well). I said I was going to salvage what I can, puree it then put on the chicken and let it bake. I still needed a starch though, so I looked over at my massive sweet potatoes and said I’ll mix some spices together and season it with that, chop some dates, bake it and that’s my starch.


You ready? Now please remember everyone, your oven bakes different to mine and putting a time on how long the prep can take depends on how fast and efficient you move. You’re at home, not a professional kitchen so just take your time and pay attention to the small details okay.


Let’s begin!


Culantro stuffed Chicken


3 Culantro


3 Cloves garlic


1 Spring onion


6 Skinless Chicken breasts


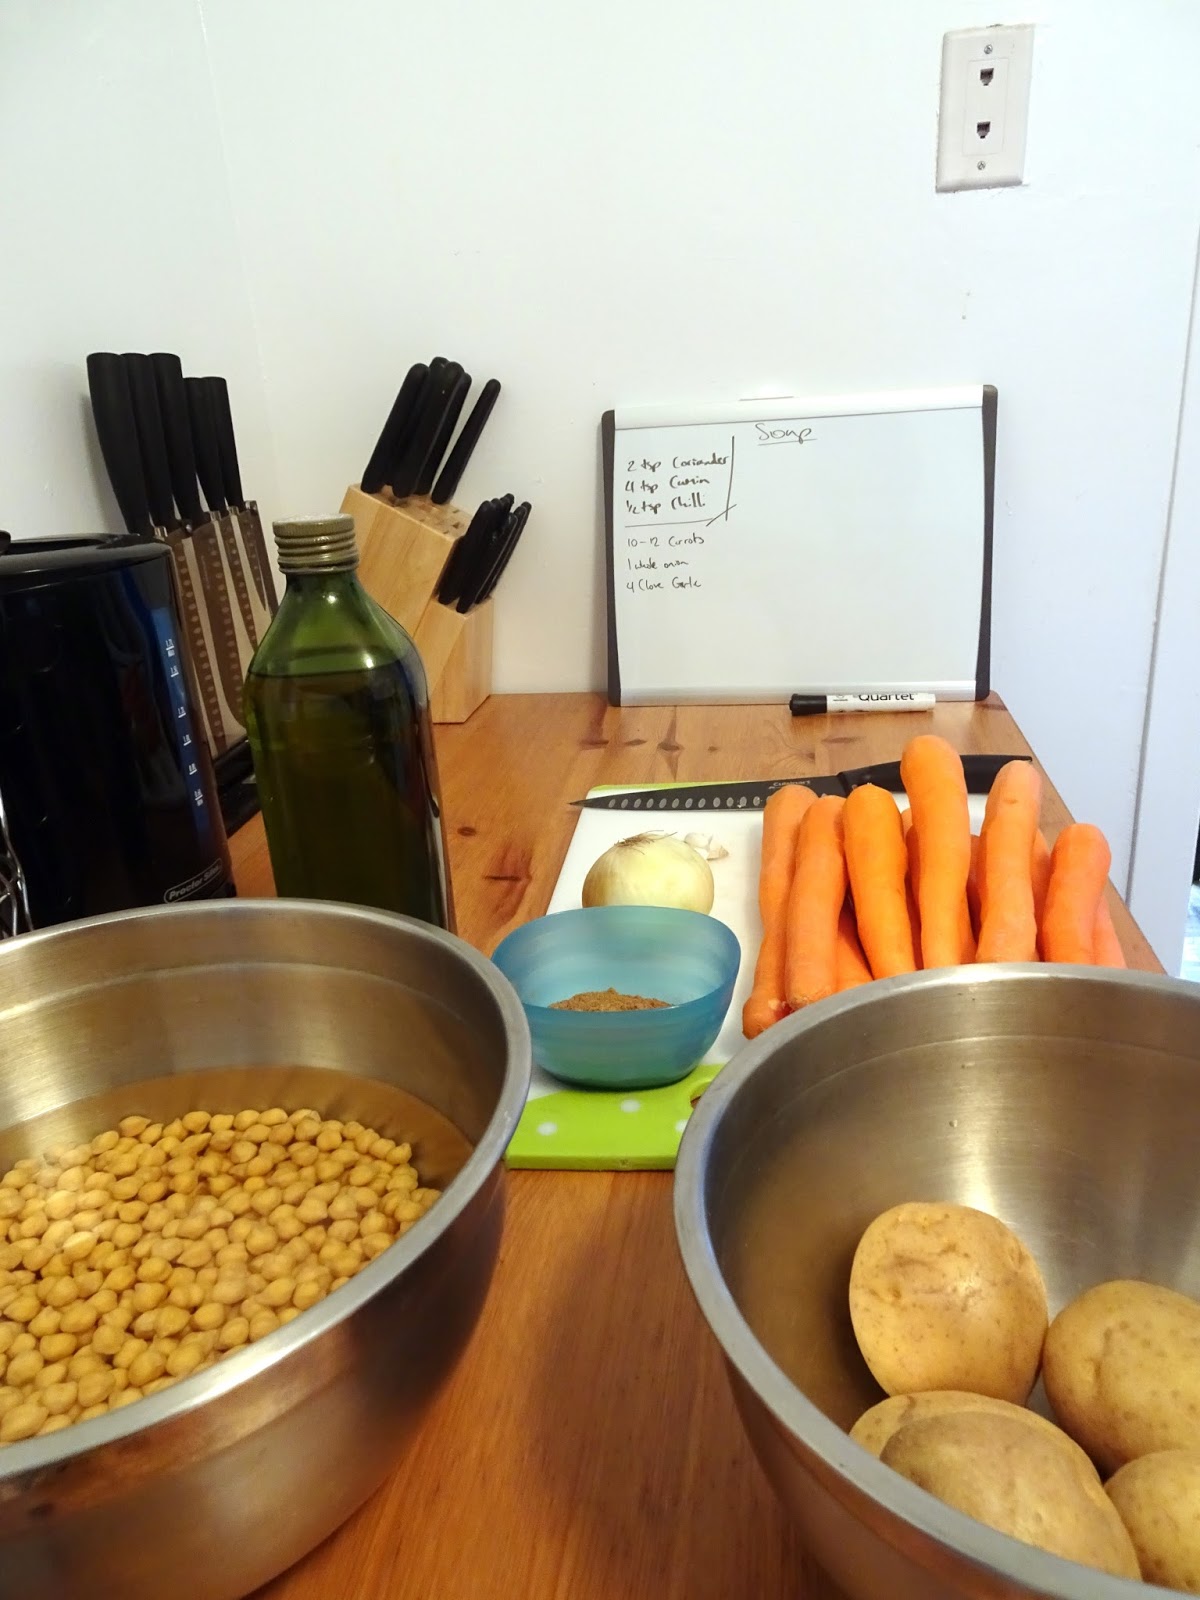
170 ml/g can corn or 6 oz corn soup


3 sprigs thyme


Spiced Sweet Potato


1 Large Sweet Potato


½ tsp Ground cumin


½ tsp salt


½ tsp pepper


½ tsp honey


5 Dates


Equipment


1 large bowl


1 med bowl


1 small bowl


1 large Pyrex or baking pan for the chicken


1 Small Pyrex or baking pan for your sweet potato


1 Cutting Board


Measuring spoon


Saute pan (I use regular pans, if you have a non-stick even better)


Spatula (something to pick the chicken up)


Tasting spoons


1 Magic Bullet or blender


Method


First thing first season that chicken with some salt & pepper and just leave it there in your large bowl while you get ready to chop your herbs up. Grab your garlic, now simply take the garlic and put on the board, take the palm of your hand, place it on the garlic and with all your weight, press down on it. This should shorten your peeling garlic time. You can then mince it, place it in your small mixing bowl. Next you want to take your culantro, wash them, line them up, chop them and add them to your mixture. Last but not least get your spring onions and do the same thing, wash them, line them up and chop. Take your thyme and remove all the little leaves because you don’t want to be eating the stem, your pretty much eating wood if you keep those. Mix your herbs and garlic and get ready to season


Next we are going to take our chicken breasts, now you can either butterfly them or run a thin knife through the top of the breasts to the bottom and season inside that way. It wasn’t until I butterflied mine I thought about seasoning it the other way. You can use a skewer or a toothpick to keep your butterflied chicken together. 


Take your chicken,stuff it and leave it on the side. 


Get your pan on the stove, a medium heat, and add some oil (I don’t use anything else besides olive or coconut oil). 

Once your pan is nice and hot, not burning or smoking, but to the point where you can see little waves of heat in the oil. If you’re not sure take the bottom of your chicken breast and just put the tip of it in the oil and look for a reaction, a crack or a simmer. 

Now place your chicken breast side down because that’s your presentation side, leave your chickens in the pan for a while, they shouldn't burn but that doesn't mean to forget them. 

Your looking to get a golden brown color on them

Start peeling that potato, it doesn’t have to be evenly peeled. Meaning the orange that you will see will have two shades, I haven’t noticed a difference in taste so you should be okay.

 You're now going to cut your potato a half inch thick, try really hard to make it even so they don’t cook fast than the other, unless you leave a tiny end piece. Put them in your medium bowl.


Don’t forget your chickens! If your chickens have that nice golden color you can take them out and put them in your Pyrex breast side up. Now your pan should have a golden color to it, it will be skin and fat. You want that in your pan because that’s all good flavor so keep the pan on the side. Preheat your oven to 350⁰ F.


Now get back to your potatoes, measure up those spices and seasonings, add them to your small bowl and mix them properly. You can now add them to your sweet potatoes. Slice your dates into thin pieces and add them as well, drizzle some oil on it. 

Mix everything and lay them properly in your dish or baking pan. Cover with foil.


Next is your corn, simply just put it in your blender (I use a magic bullet for everything) and let it go until it’s smooth.

 Once that’s done get that pan that I told you to save and get it on the stove again, add your puree and bring it to a simmer, scraping all that lovely brown goodness from the bottom. 

Once that’s done, pour it over your chicken and cover with foil.


Place both dishes in the oven for 30 minutes. Please don’t just sit down and forget about it. Check it in intervals, I suggest in 15 minutes, set a timer, and act like you care. Your sweet potatoes may take longer, just watch them.


I really liked this dish, it was a good way of getting rid of some left over soup and using it for a sauce. The culantro brought a fresh taste to it, almost lightening the heavy corn. I hope you enjoyed this recipe every one, the usual goes, leave me a comment a suggestion, something you think would make it easier or more convenient. Criticism is always welcomed(welcome).