Thursday, February 18, 2016

Can you Beet like me? Beet Powder


Hey everyone! Friday is around the corner for you TGIF people. That means you get to spend a whole weekend cooking! Well, I hope you get some cooking and experimenting done. Especially after I show you a neat little ingredient that you can add to your pantry list with ease.

 If you love Beets, this is definitely a cool way to use them. This recipe is quick, and easy. You will need:-

1 lb. Beet

This is probably the shortest recipe you’ve ever read in your life. Anyway, it’s pretty simple everyone.

Get your beets and peel them. Give them a quick rinse, just to get rid of any leftover skin or dirt.


Now, if you have a mandolin then adjust it so you get paper thin slices. If not, get those knife skills working. Just try to maintain a consistent thinness so they can be evenly cooked.


Place them on the trays of your food dehydrator or on sheet tray for your oven. Bake them at 150 F for 3-4 hours. They should be nice and crispy


Now I checked them every hour just to track their progress. You don’t want them to burn so please don’t forget. Once they’re done, let them cool then give them a quick run through your blender or food processor. If you have a coffee grinder, then that’s even better. We want to make sure we grind everything to a fine powder.

Make sure you keep them in a dry air tight container.
There you have it, your very own beet powder that can be used for your dishes as a garnish, smoothies, or DIY facemasks.
#beetpowder #Foodphotograhy


Wednesday, February 10, 2016

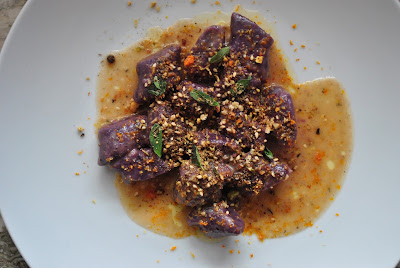
Hot Potato: Purple Gnocchi in Brown Butter with Dukkha, Citrus zest, Smoke cheddar & Breadcrumbs


Good Night everyone! I hope all is well in the world of Culinary Arts. So you all remember when I went shopping two weeks ago and picked up a bunch of random items from the market? Today, well tonight I made Purple Sweet Potato Gnocchi. I’ve also never made this before but it seems that the purple potato’s have almost the same amount of starch as an Idaho potato. I managed to make 40 pieces of gnocchi out of this recipe and while most people like to use a whole egg, I use just the egg yolk. It makes the gnocchi richer.
The key things to remember about making gnocchi are (1) you don’t want the potato to cool down too much, this will make the process a lot harder. (2) Don’t over work the dough, if you over work potato starch it can become very gloopy and sticky, which would mean you would have to add more flour than needed. (3) Some people may disagree but I find baking a potato on a bed of salt helps dehydrate it better.

It has been three years since I have made Gnocchi and there some things in life you don’t forget. My old friend & boss Alex Grimley was the first person to teach me how to make gnocchi, even then it took me 4 months to get it right without having to ask him constantly to show me or is this correct. I have a lot to thank him for and that is one of them. You see I will type up this recipe and tell you how to do it, but you really need to have an understanding on how to feel if the gnocchi are ready to go. Too many people make the dough and don’t understand why it isn’t firm or why its falling apart. Somethings, you just gain from experience. I will try my hardest to make this understandable for you the eager home cook.

Let’s go!
2 Gnocchi (1 lb. in weight)
2 egg yolk
1 Cup All purpose flour
1 Pair of hands
Nutmeg (this is optional)
Kosher Salt

Preheat your oven to 400 F. Get a baking sheet or pan, pour salt on the base. Place the potatoes on top, take a fork or knife and just give the potato a few stabs to allow the seam to come out while its baking. Put your potatoes in for one hour. 
While that’s going just get your other ingredients out and ready. If you have a clean counter top, then we can use it for kneading the dough. If you don’t want to put it on the counter top, then grab the biggest stainless steel bowl you have.

Please get a medium sauce pot of salted water on the fire, boiling and ready for your potato’s.
Has it been an hour yet? Okay good! Now take the potatoes out and cut them in half. Please be careful to not burn yourself when the steam comes out. 
Leave them to sit for 5/7 minutes. You want to be able to push the inside and feel the heat with out totally burning your fingertips off, you will need them for later. Once the potato is ready, you can push it through a strainer, well, if you have one of those perforated bowls then use that. If not, then just mash it a bit.
Now add a little under a ¼ cup of flour to the potato, and knead it a little, then add one egg yolk and add more flour. You may not need all the flour but once you roll it around and work it, just feel it out. The only way to describe this is, feel your cheek. If the gnocchi are a little harder than your cheek you on the right track. Now roll your dough on your table into a 6-inch log and cut it in half. 
Take one half and let’s roll it ¾ inch thick. Be sure to have flour on the table so it doesn’t stick. Grab your knife and cut the Gnocchi into ½ inch squares and put on a floured pan for storage.
Before we cook the gnocchi be sure to have another pan (I used a glass Pyrex dish), just add some oil so they don’t stick. If you don’t have a glass Pyrex then use what u have, line it with parchment paper and add oil.
We’ve got boiling water right? Okay so we are going to drop some gnocchi in the water and leave them until they float, it usually takes a minute. We don’t want to drop all the gnocchi in at the same time. If you do that, the water wont boil anymore. Once we have cooked the gnocchi just place them in your oiled pan and allow them to cool for when you want to cook and prepare a dish later.

A lot of people like gnocchi because its heavy. Its typically served in brown butter and sage. I did mine in brown butter, citrus zest (see post from last week Friday), Dukkha, breadcrumbs and oregano. I love Gnocchi. 

Saturday, February 6, 2016

Eggplant Moutabel

Eggplant Moutabel Dip

Super bowl is coming up this Sunday everyone. If you want to impress your friends and family this weekend with something different, give this Eggplant Moutabel a shot. I love it because after you roast eggplants it gets a Smokey taste to it that just hits the tongue just right. This is easy and very simple, you can simply have with Pita, crackers, even use it as a spread in your sandwich.

All you need is: -

2 Eggplants
Canola oil
Oregano (picked)
Salt
Pepper
Dehydrated lemon zest (please check previous post)
Chili powder

Preheat your oven to 400⁰F as we cannot cook without a little heat in the oven. Find a roasting pan or Baking sheet, pour some oil on the base and lightly season the pan with some salt ad pepper. Place the eggplants in their skin on the surface of the pan, give them a drizzle of oil and also a light season. Place in the oven for 30 – 45 minutes. 

Once its done put in a bowl and cling wrap the bowl for about 10 minutes. The steam will help cleaning the eggplant easier. Once its ready, just cut the top off and peel the skin from the top to bottom. 


We will then add it to our blender along with a little salt, pepper and about 3 Tbsp. of Canola oil. If you have one of those blenders with the little screw cover for the lid, then you can take it off to add more oil to get the right colour (as seen in the pictures). 


Constantly taste it, season if needed. Once you’re done put it in your bowl, add your picked oregano, zest, and chili. Serve it, surprise your friends and show off your culinary knowledge & skill.


Friday, February 5, 2016

Save that Zest!


  Hey everyone! You know those lovely lemons and oranges you have at home? Before you use them save the skin. The best way to do this is to use a zester or micro plane (they are cheap, and everyone should invest in one). Just give them a quick run on the micro plane and dry them out on a paper towel for 24 hrs.
Keep it, use it on a fish, after cooking a risotto, or a small salad. It’s a great cheap ingredient to keep laying around in your pantry.


Thursday, February 4, 2016

Blood Orange and Red Papaya Relish

Good morning everyone, today’s blog will be a little shorter than normal. Have you ever gone to the supermarket, see something and just buy it out of reflex? Well, while I was at the groceries last week I saw red papayas and got them not knowing what I was going to do, but it didn’t matter. It wasn’t until today I opened my fridge and stared at it for five minutes before thinking of what to do. I took a look through my culinary artistry and figured let’s make a relish. Now relishes are slightly similar to chutney’s but they are a bit savory. I liked this not only because you could taste all the fruits but it wasn’t as sharp as I thought It would have been, and you get a slight garlic taste at the end.

As I was juicing the blood orange, it reminded me of being back in A Voce and making a vinaigrette in the morning. Nothing was better than seeing that rich deep red leak out of the orange. Today all I could do was stare at this blood orange juice in amazement.
Let’s get to making this relish now.

1 med Red Papaya (seeded & peeled)
1 Blood orange (halved)
½ Garlic Clove
1 Tbsp. Ground Mustard
¼ tsp Ground Chili
½ Cup Apple Cider Vinegar
1 Cup Sugar
1/8 tsp Kosher salt


Combine all ingredients in a food Processor, and chop. Once mixed add to a non reactive saucepot and bring it to a boil for 30 minutes. This will help cook out a bit of the harsh acid from the vinegar and the garlic flavor. Please stir it every once in a while. Don’t leave it sitting there to stick and possibly burn. Once this is done, cool it to room temperature then put in a jar and refrigerate.


Tuesday, January 19, 2016

A restaurant's inspiration: Roasted Bell Pepper & Corn Chutney

Good Morning everyone! I hope all of my foodies are well. Last week me and my girlfriend made our second round to what might be one of our favorite restaurants downtown. Carmen’s is a great little Spanish restaurant that does tapas style food on Queen West. After we did our trip to Spain, we were having tapas withdrawals and finally, we found a restaurant to give us our fix when we needed a little Spain in our life! We knew exactly what we were having along with a few new additional items to try. There was one specific dish that made me smile, the Tomate Verde Frito con Queso Feta, Maiz y Pimientos (breaded green tomatoes, feta, roasted red peppers and corn chutney). The Chutney was so good, and being a cook I instantly wanted to try recreating it myself. So that weekend I decided that I was going to experiment. It didn’t matter whether or not I knew how to make a jam or chutney. In the end, I took it as an opportunity to be able to practice something and maybe when I am done I might think of a new idea or dish.
Here it is, my recipe for a Roasted Pepper & Corn Chutney
1 Roasted red bell pepper(rough dice)
1 Small onion (diced)
2 cups corn
½ Cup sugar
1 tsp Salt
1 tsp Coriander
½ tsp Cumin
¼ Cup Apple Cider Vinegar
1 Lemon Zest
Season your bell pepper with salt, pepper and oil. You want to roast it evenly in the oven. I roasted mine at 450 F for fifteen minutes on each side. The point of this is so that skin can come off. So if you notice the skin starts separating from the pepper, you're doing the right thing. Once your pepper is finished, get it in a bowl and cling wrap it. 
The steam will help continue any separation that needs to be done. Get all of your other ingredients together. Once you’ve done that then peel the pepper and give it a rough dice. Combine all the ingredients in a pot, covered on a low heat until the liquid is almost dehydrated. Its not going to be extremely sticky like that of a jam. Taste it periodically, get an idea of the textures and flavors as it cooks, understand what happens as you leave it on longer. Sure this is something that you just leave to sit but watch it every fifteen minutes, see what you can learn from it.

In the end I was very happy with the taste, I think next time I might put more peppers. Mine came out a little bit more orange looking and wasn’t as red as Carmen’s own but nevertheless it was yummy and is now in my fridge waiting to be used on a new dish.

Friday, January 15, 2016

A book I love: Culinary Artistry

Hey everyone I hope all is well out there in the culinary world. I know its been a while since I’ve done a book review and I’m hoping this article will be able to shed a new light on a book that I try to live and die by. It is honestly one of the greatest books, when it comes to ingredients and advice on dishes. The first time I came across the book “Culinary Artistry” was when I was attending the local hospitality college back in my home country of Antigua and Barbuda. I had a really close friend who I felt was a bit further ahead of me in the culinary field when it came to food memories and imagination. He introduced me to the book. It felt like a shining light came from the heavens as I held it - the key I needed to help take a step forward. As I flicked through there were so many ingredients I knew nothing about and immediately felt a jolt of motivation and love for my new discovery. Eventually I got my own book, given to me by my grandmother. I felt like no one could stop me now.

It’s a soft cover book written by Andrew Dorneburg & Karen Page, and is at least 20 years old. But I would advise you to always keep it nearby. It talks about being an artist, choosing a medium, understanding flavors, combining flavors and much more. There is a wealth of information in here from a few chefs, who give a quick reasoning behind a dish or a menu. This way you have an understanding of why everything was done or the logic behind it. From this book your brain could instantly start getting ideas and techniques. It doesn’t limit you to a specific technique with a meat or cuisine, but shows you how versatile one can be in this field.

I remember reading a section where one chef, Patrick O’Connell, understood that you can’t just serve barbeque pulled pork in a restaurant and charge people any amount of money. So instead he took a boneless rack of lamb and barbecued it and made his own twist.

Your ability to create is only limited by your imagination and curiosity. If you already have a curious mind, then get to reading. I take little markers and tag pages that I like or don’t want to forget. If there is an ingredient you can think of the book usually has it. Being about 20 years old, there have been a few ingredients I haven’t been able to find, but I can count on both hands how many times that has happened since I’ve owned the book. Also, if you can’t find it in the book just look online. Once you have this book you can make your own notes on the side of a page if you have an idea that you should jot down. At the back of the book is the long index, you will find that some ingredients will have multiple page numbers. That’s because some ingredients have a sub category called “accompaniment”, or they are mentioned in a recipe. I can guarantee that you will find your ingredient though.

I think the book is awesome and I am hoping one day that there will be a new issue with more ingredients added to the list.